Learning objective:
In this tutorial, you’ll learn how to set up a development environment for building your first Web3 decentralized application (dApp): a decentralized to-do list.
Along the way, you’ll explore:
- Writing smart contracts in Solidity.
- Using Hardhat to test and deploy smart contracts.
- Connecting a front-end (React) to interact with the blockchain.
- Installing VS Code with the Solidity extension for an optimized development experience.
By the end of this tutorial, you’ll have a functioning smart contract that forms the backbone of your dApp.
Prerequisites
Before starting, make sure you have the following installed on your system:
- Node.js (LTS version recommended)
Download from Node.js Official Website. - npm (comes bundled with Node.js) or yarn.
- Git for version control (Install Git).
- VS Code as your code editor (Download VS Code).
- Install the Solidity extension in VS Code for syntax highlighting.
- Open VS Code → Extensions (
Ctrl+Shift+X) → Search forSolidity→ Install the extension by Juan Blanco.
- Open VS Code → Extensions (
Once you’ve installed the prerequisites, verify them using:
node -v
npm -v
git --version
Step 1: Create Your Project
First, bash into your local development folder and create a new directory for your project, then navigate into it:
mkdir decentralized-todo-list
cd decentralized-todo-list
Step 2: Install Hardhat
Hardhat is a development environment to compile, deploy, test, and debug Ethereum smart contracts. Start by initializing your project and installing Hardhat:
# initialize your project with npm:
npm init -y
# install hardhat
npm install --save-dev hardhat
# create a hardhat project
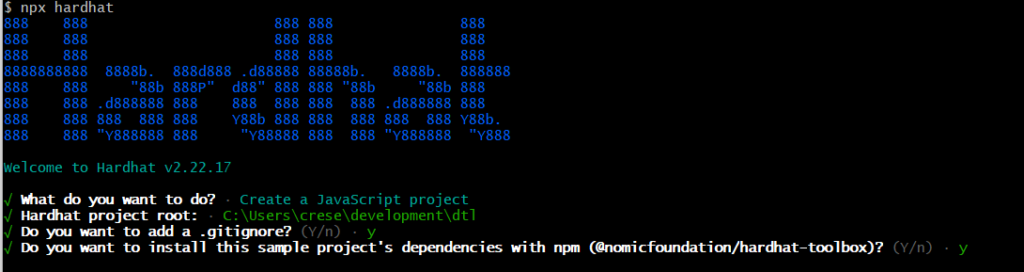
npx hardhat initSelect “Create a JavaScript project” from the options. This sets up the necessary files and configurations. You can what I’ve done below:
Step 3: Write the Smart Contract
Rename the default Lock.sol contract to TodoList.sol in the contracts folder with the following code:
// SPDX-License-Identifier: MIT
pragma solidity ^0.8.28;

contract TodoList {
    struct Task {
        uint id;
        string content;
        bool completed;
    }

    mapping(uint => Task) public tasks;
    uint public taskCount;

    event TaskCreated(uint id, string content);
    event TaskCompleted(uint id, bool completed);

    function createTask(string memory _content) public {
        taskCount++;
        tasks[taskCount] = Task(taskCount, _content, false);
        emit TaskCreated(taskCount, _content);
    }

    function toggleTaskCompletion(uint _id) public {
        Task memory task = tasks[_id];
        task.completed = !task.completed;
        tasks[_id] = task;
        emit TaskCompleted(_id, task.completed);
    }
}
Make sure you edit the version of solidity so that it matches the version you just installed. Check the screenshot of the hardhat installation step to find your version.
This contract:
- Stores tasks in a
mappingwith a unique ID. - Allows creating tasks (
createTask) and toggling their completion status (toggleTaskCompletion). - Emits events (
TaskCreatedandTaskCompleted) to log actions on the blockchain.
Step 4: Test the Contract
Testing ensures your contract works as expected. Rename the file in test/Lock.js to test/TodoList.js and then overwrite the code:
const { loadFixture } = require("@nomicfoundation/hardhat-toolbox/network-helpers");
const { expect } = require("chai");

describe("TodoList", function () {
  // Define a fixture to set up the contract for each test
  async function deployTodoListFixture() {
    const [owner, otherAccount] = await ethers.getSigners();

    // Deploy the TodoList contract
    const TodoList = await ethers.getContractFactory("TodoList");
    const todoList = await TodoList.deploy();

    return { todoList, owner, otherAccount };
  }

  describe("Deployment", function () {
    it("Should initialize with task count as 0", async function () {
      const { todoList } = await loadFixture(deployTodoListFixture);

      expect(await todoList.taskCount()).to.equal(0);
    });
  });

  describe("Creating Tasks", function () {
    it("Should create a task successfully", async function () {
      const { todoList } = await loadFixture(deployTodoListFixture);

      // Create a task
      await todoList.createTask("Learn Web3");

      // Fetch the task from the contract
      const task = await todoList.tasks(1);

      // Validate task attributes
      expect(task.id).to.equal(1);
      expect(task.content).to.equal("Learn Web3");
      expect(task.completed).to.equal(false);
    });

    it("Should emit a TaskCreated event", async function () {
      const { todoList } = await loadFixture(deployTodoListFixture);

      await expect(todoList.createTask("Learn Hardhat"))
        .to.emit(todoList, "TaskCreated")
        .withArgs(1, "Learn Hardhat"); // Task ID and content
    });
  });

  describe("Toggling Task Completion", function () {
    it("Should toggle a task's completion status", async function () {
      const { todoList } = await loadFixture(deployTodoListFixture);

      // Create a task
      await todoList.createTask("Learn Solidity");

      // Toggle completion
      await todoList.toggleTaskCompletion(1);

      const task = await todoList.tasks(1);

      // Verify the task is now completed
      expect(task.completed).to.equal(true);
    });

    it("Should emit a TaskCompleted event", async function () {
      const { todoList } = await loadFixture(deployTodoListFixture);

      // Create a task and toggle completion
      await todoList.createTask("Learn Hardhat");
      await expect(todoList.toggleTaskCompletion(1))
        .to.emit(todoList, "TaskCompleted")
        .withArgs(1, true); // Task ID and new status
    });

    it("Should toggle completion status back to false", async function () {
      const { todoList } = await loadFixture(deployTodoListFixture);

      // Create a task
      await todoList.createTask("Learn Blockchain");

      // Toggle completion twice
      await todoList.toggleTaskCompletion(1);
      await todoList.toggleTaskCompletion(1);

      const task = await todoList.tasks(1);

      // Verify the task is now incomplete again
      expect(task.completed).to.equal(false);
    });
  });
});
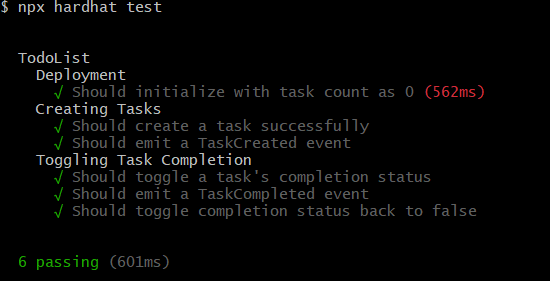
Run the tests:
npx hardhat testIf successful, your bash window should similar to the following:
Step 5: Deploy the Contract
To deploy the contract, you need to create a scripts folder and then create a new file scripts/deploy.js:
// Import the Hardhat runtime environment
const { ethers } = require("hardhat");

async function main() {
  // Step 1: Get the contract factory
  const TodoList = await ethers.getContractFactory("TodoList");
  console.log("Contract factory loaded.");

  // Step 2: Deploy the contract (this automatically waits for deployment in Ethers v6)
  const todoList = await TodoList.deploy();
  console.log("Contract deployment initiated...");

  // Step 3: Log the deployed contract address
  console.log(`Contract deployed successfully!`);
  console.log(`TodoList deployed to: ${todoList.target}`); // Use `.target` for the address in Ethers v6
}

// Execute the main function and catch errors
main()
  .then(() => process.exit(0)) // Exit the process if the deployment succeeds
  .catch((error) => {
    console.error("Error during deployment:", error);
    process.exit(1); // Exit the process with an error code if deployment fails
  });
You’ll need to have two bash windows open to run the server and deploy the contract.
# window 1: start the local server
npx hardhat node
# window 2: deploy the contract
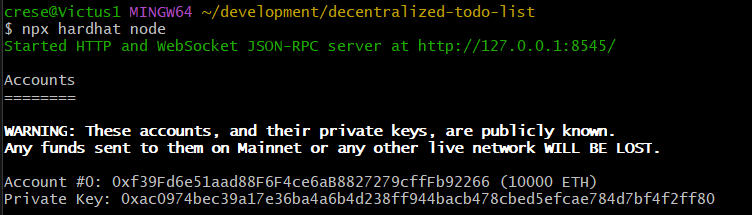
npx hardhat run scripts/deploy.js --network localhostIf the server starts correctly, you should see something similar to the screenshot below:
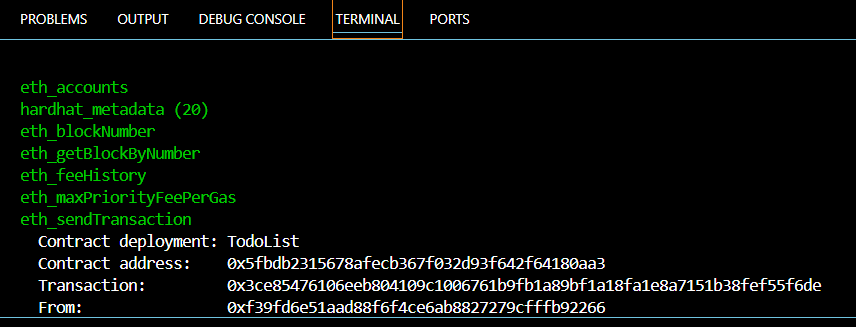
If the deployment is successful, you should something like the screenshot below:

Now go back to your other bash window and you should something similar to the screenshot below:
Wrapping Up
So far, you’ve laid the foundation for your decentralized to-do list dApp by:
- Setting up a fully functional development environment with Hardhat and Ethers.js.
- Writing and deploying a smart contract on a local blockchain.
- Testing the smart contract to ensure it behaves as intended.
By completing these steps, you’ve gained hands-on experience with the fundamental building blocks of blockchain development, including Solidity, contract deployment, and testing.
What’s Next?
In the next tutorial, we’ll build a front-end for your decentralized to-do list using React and Ethers.js. You’ll learn how to connect the interface to your smart contract, interact with the blockchain, and deploy everything to a public testnet. Stay tuned, and get ready to bring your dApp to life! 🚀